Continuous Integration
Validating policies in your CI workflows allows you to check for potential policy issues each time a change is made to your policy source code. Common Fate policy validation can be run in CI platforms such as GitHub Actions, GitLab, and BuildKite.

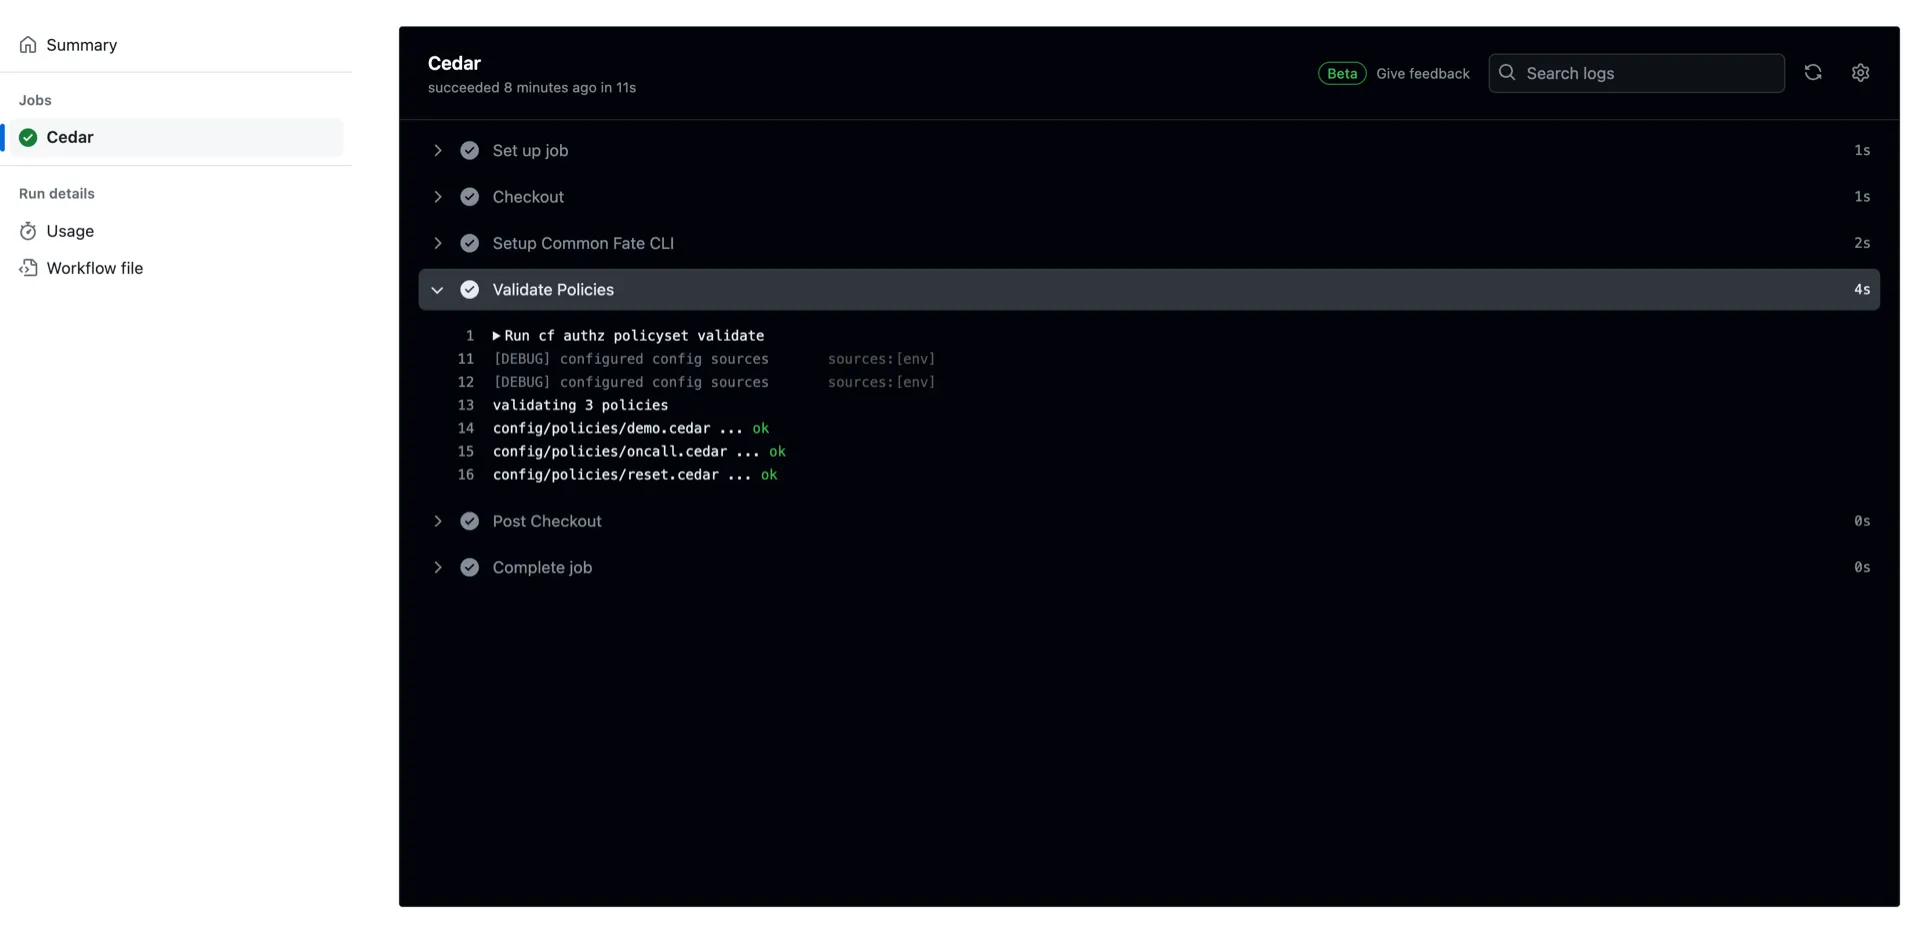
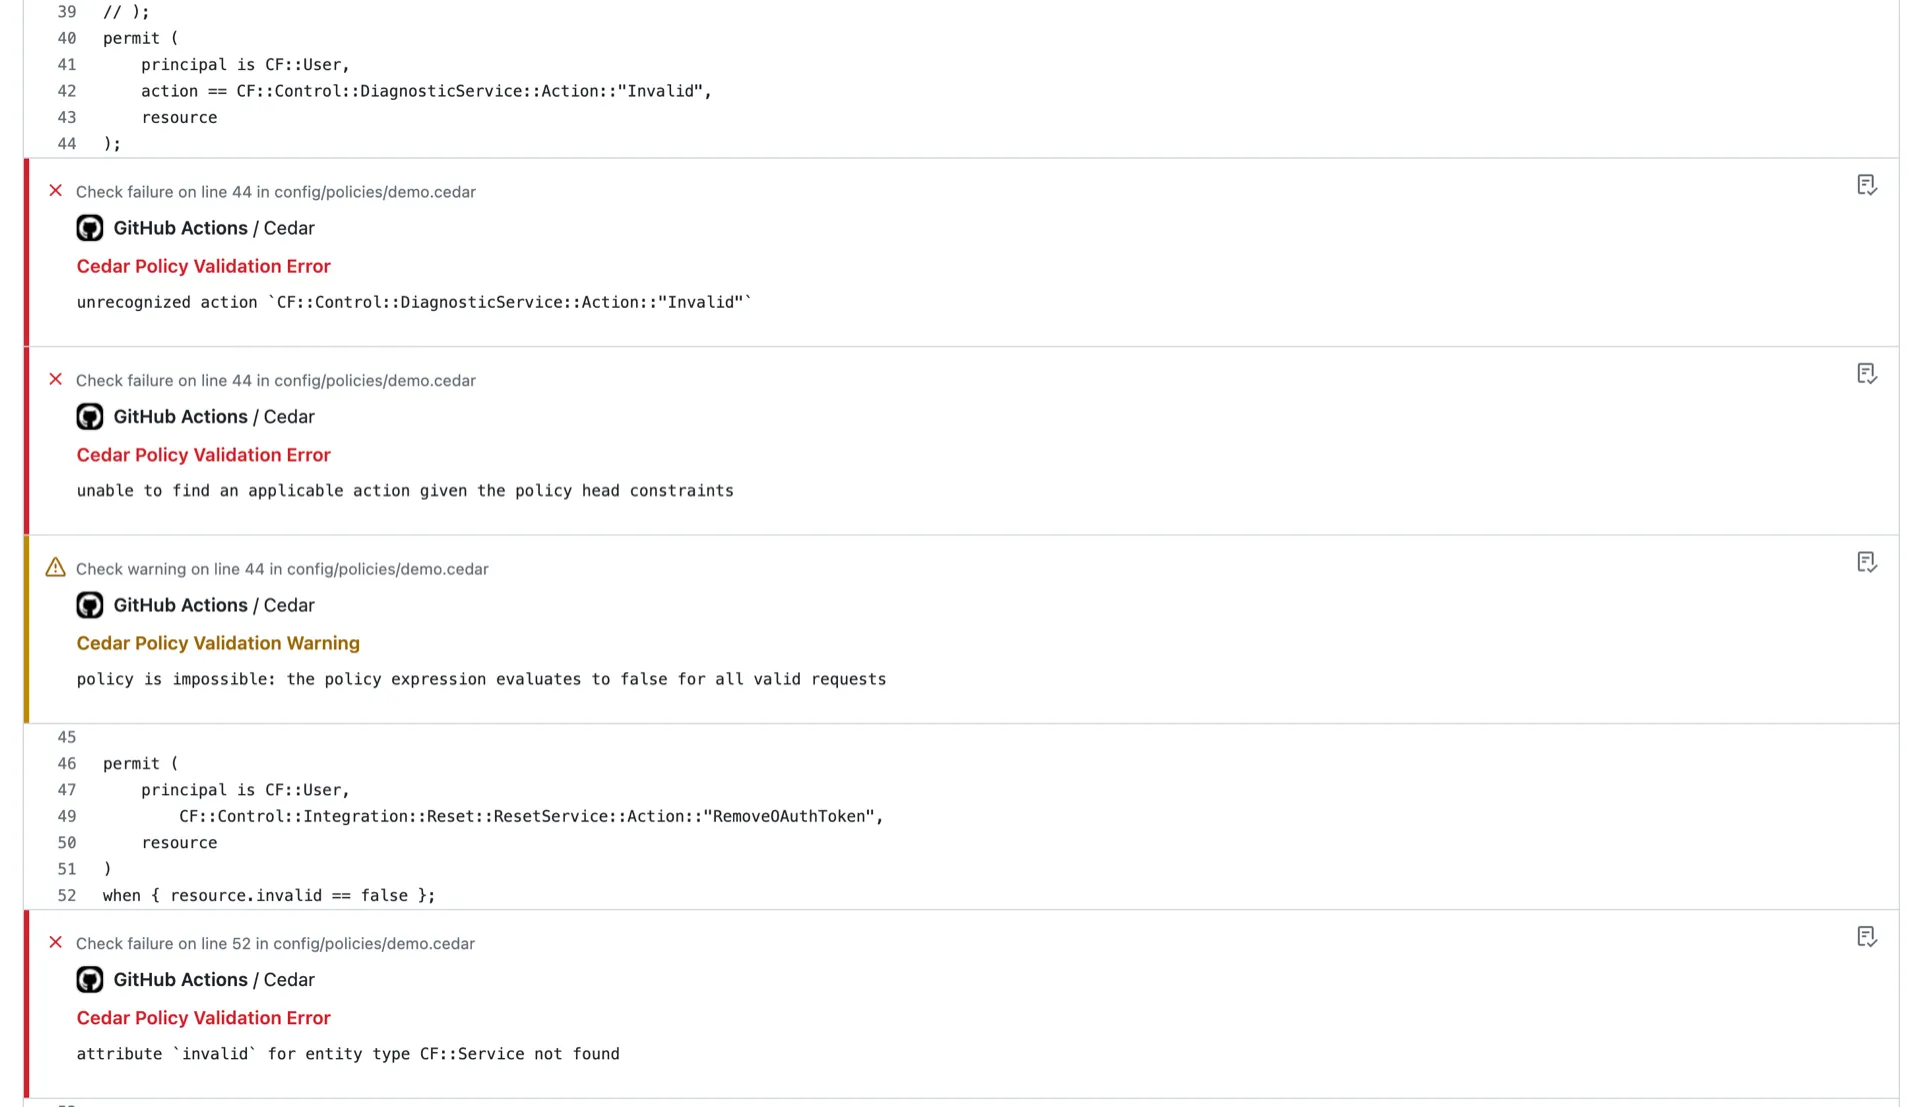
If you use GitHub Actions, our Cedar Policy Validation Action will show annotations on Pull Requests, indicating where issues are in your policy source code.

Prerequisites
If you’re running a BYOC (“Bring-Your-Own-Cloud”) deployment of Common Fate in your own AWS account, you’ll need to be on v1.31.0 or later of the common-fate/common-fate-deployment/aws Terraform module.
Policy validation in CI
Choose a tab below based on your CI provider.
To validate policies using GitHub Actions, you can use the Download Cedar Schema Action to download the latest Cedar schema, and use the Validate Cedar Policies Action to validate against the schema.
Here’s an example workflow.
name: Test
on:  push:
jobs:  cedar:    name: Cedar    runs-on: ubuntu-latest    steps:      - name: Checkout        uses: actions/checkout@v4
      - name: Download Cedar Schema        uses: common-fate/download-cedar-schema-action@v1        with:          deployment-url: https://commonfate.example.com # replace this with your Common Fate API URL          oidc-client-id: abcdefGHIJKL12345678 # replace this with your Client ID          oidc-client-secret: ${{ secrets.CF_OIDC_CLIENT_SECRET }}          oidc-issuer: https://cognito-idp.us-east-1.amazonaws.com/us-east-1_abcdeFGH # replace this with your Issuer          save-schema-file-to: common-fate.cedarschema.json
      - name: Validate Policies        uses: common-fate/cedar-validate-action@v1        with:          schema-file: common-fate.cedarschema.json          policy-files: "**/*.cedar"
As shown above, the workflow requires a few configuration variables to tell the CLI where Common Fate is running (api-url), and how to authenticate to it (oidc-client-id, oidc-client-secret, oidc-issuer). You can obtain api-url and oidc-issuer from your Terraform provider configuration block:
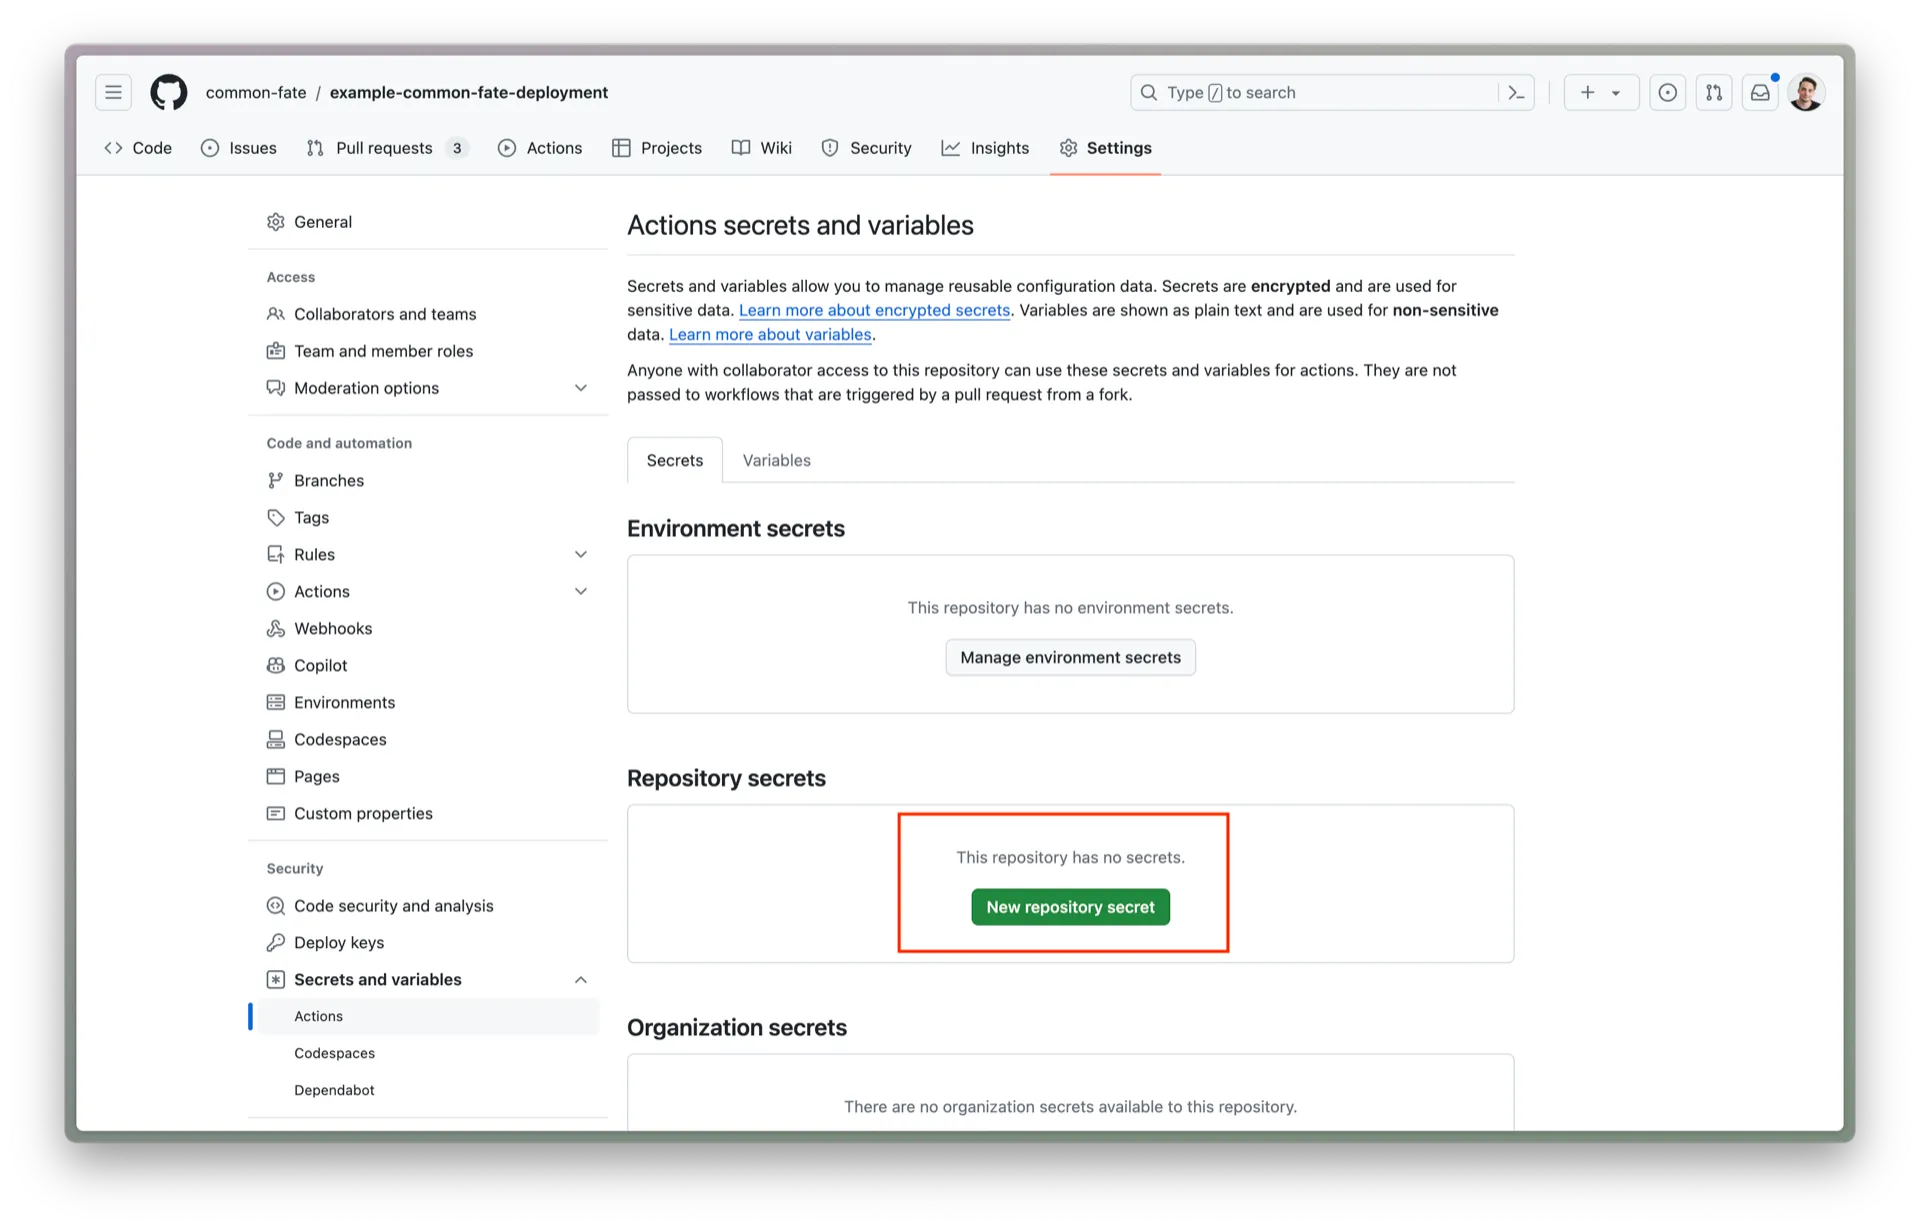
provider "commonfate" { api_url = "https://commonfate.example.com" # corresponds to 'deployment-url' in the workflow oidc_issuer = "https://cognito-idp.us-east-1.amazonaws.com/us-east-1_abcdeFGH" # corresponds to 'oidc-issuer' in the workflow}You can look up the Read-Only client credentials for oidc-client-id and oidc-client-secret by finding it in the deployment outputs following our guide here. Save the OIDC client secret as a GitHub Actions Secret with the name CF_OIDC_CLIENT_SECRET to keep it out of your source code.
The Read-Only client has read access to the policy and configuration APIs but cannot be used for destructive actions.

Copy the script and signing key into your repository:
KEY_FPATH=common-fate-signing-key.asc
# import the Common Fate signing key
gpg --import $KEY_FPATH
# extract the public key ID
KEY_ID=$(gpg --list-packets <"$KEY_FPATH" | awk '$1=="keyid:"{print$2;exit}')
# mark the key as trusted
(echo 5; echo y; echo save) |gpg --command-fd 0 --no-tty --no-greeting -q --edit-key "$KEY_ID" trust
curl -OL releases.commonfate.io/cf/v${CLI_VERSION}/cf_${CLI_VERSION}\_linux_x86_64.tar.gz
# verify the CLI signature (see: https://docs.commonfate.io/granted/security)
curl -OL releases.commonfate.io/cf/v${CLI_VERSION}/checksums.txtcurl -OL releases.commonfate.io/cf/v${CLI_VERSION}/checksums.txt.sigshasum -a 256 -c checksums.txt --ignore-missing
gpg --verify ./checksums.txt.sig
sudo tar -zxvf ./cf\_${CLI_VERSION}\_linux_x86_64.tar.gz -C /usr/local/bin/ -----BEGIN PGP PUBLIC KEY BLOCK-----
mQINBGCb9UABEADcK6S4PPSDZRcgR4ToKvljghmL3m8v9A32CvHOTBpWumhfmHoi9zDq/fB/vzhMcxGKrD4D64Rna3T2L2NGVEYTxwm4iwTNBNxKb1VFRlXKZtqXsYk6JCplGLinkSROoZhhGFbJjUE5GGbnuhWgAZbJRd937rumHgA9RNXy2lV0APQo9qvRTkOfqS8LgKNQDY7ljYcGsNgj1uWTqshsYzqm7D/QLy9L+9zR9nD7oO7yoJAmbeyORayAXcZZafw/SXHHZDeiuQgJwsuAP+Xgg63TGyAZgB/k73tAvw+CfNKejlan0r2uI7JvP9RZI+q+UXVKtiWYCadvmMD6TnXpwlDguR1wF9O8I00UjSm9Uv8I4IHVlaO4cX1NOfA4LaHEgH+43Zefkcl0kq1gkHOq34JjHf1DNAaxT4BDx8GZPIw14dXw3PLuCF1xAjqTA5KuAH6A91ZeIkaYAWmZJeZo7HyLXhrN9oMeFY0EyAXBcnHLapHcqwlq32eECjN1k6wgeiygNjOLvGx5n3UG5lTg3EJ3CIAwxnWROGQDnZ3u3ibxJi80saVvIBpheTr+hIUQMal/3QKX4JRl/+CYbtypazIOc9UNRxEkRENqJTaD24ww//iyITXYL5yXlhl5Z8nIJui4q3z1nBvmTBkF1H0BVacBPeI2abEXZjMp2L2FT7cZJQARAQABtCRDb21tb24gRmF0ZSA8c2VjdXJpdHlAY29tbW9uZmF0ZS5pbz6JAk4EEwEIADgCGwECF4AWIQRlq3JbAeZchQUfn9VQJHir49jtcQUCYJv2rgULCQgHAwUVCgkICwUWAgMBAAIeBQAKCRBQJHir49jtcXdeEACpc9jNKsZWKD6ozToKIK3/RBHNwfEIoaAb8hvm18y51HA3ugKsSxjf2zkX8zwGpIdzM8QiMTKEAK2Ka0cYP9ZMGGE5NuzTy44SP+MRUUvXC5QNSIfH+eD/PxNih2pxLzUGGaqMuPzHAP4aovx/0GMzFWpOR6AIgVHo+zmygfpiWmYbBntDcMsRssTGkfnisuL/QJ7cWTl+mStg5wJybTXGdm6A6bGlqp3n+UDjq1s9vQRfq1kFZJdu36LbG5OZMGVzQswtZtj5DOMSQWgwnJdSPjJrnFbe4ieu3rFysdE3gu+ZFKdNN+v1FUOtwo0I3W7m2W4axJc3wpcQXbYZGw2RsAgWpKHSN8uVzT9CYxl7MoANDvxwmQVLRFUao3qtSZVJtNo829145/dS88Auawf0PpV1yEFPf9FkWJQOVjSQnq8vwsoNivMOcBh+kpsYHVi9IEbMEBwK/FS79NFAl63tb4Z5JKHXLYEVU5D/PmCFCd326QDAWzELvEAW45SH6G6TCSW2yy/Q2wf+VXfenm1THzCsIhaS0TDlQCPM60uqzVy0Cg7TCbrIp4AKrZoAypd4fIzvsnVHZg6iqPHHT74ZKC4tyljWE0VJZTqLrakjXyrNX03IHJ/qGplreOnK4sAm19kISVI3Np9XEllAhrDv8478nmM0Q66ej14VQKjTlLkCDQRgm/vrARAAuqUKr/Gb2Il235ramYnjDzJH8zErpO90Cd7SXKMdBtw5ArBG1k9d6QeorB/6Z21A3Xf0QphiUkfNeWXlkcewuFwDBJiIv4Y2XC/EzmxRA9B0OX5A44TityUKWQbdNpxhNqiOEnqGqV2DVwxkOdeuaBc4cXbEKL+DRnZVMNdwBilakl3ZX5b8uyGXnZm4ExACi4Cs63r4vd3s0sQoT4YxiCusaVnJSsvt+Tk6qMcFyqlWca9DBTsFXCkDCsBiXMDDkU+03rJvBsh1r+9ZqOGgrecB8hMCPrJ6omr4MLmtwLFOFyYcsuar5IPUenws3g1NIK31kDX/I4ARN560LKovj8rSJOEFhAQ2JRPV0hJ8iFqkq0+pJtlXMsq57SDgpaECJ+R+tkUuqal1W+cqiwW6yRP7GrqxPogJsThucES8RiE3IT0IRBv70OYvP268Y/392p8VrBDifsy+BWfRrX6kLDSYKyCBrbeQ8dA4uk7YZJg1p5uevCiCOQ+MbFucRHxHaLv7xf+3Gvac8R2F///T4NjxdcNWorz158ZuOb1G3uN/4auwNFcDKv2+ASeTgTLZP1VBuOB9fieyY/9YI1d5wcxKQ+z69NQjYJNkxs7PHZWEakuztIWna72KqEYVMs4+tVyli+2dkcJD8KpHlvoVKH6Vl7KCiic5lx6FPf+Ku0MAEQEAAYkEbAQYAQgAIBYhBGWrclsB5lyFBR+f1VAkeKvj2O1xBQJgm/vrAhsOAkAJEFAkeKvj2O1xwXQgBBkBCAAdFiEEEOpsCUoAPpLrr9eQ7h1EHJHTBIUFAmCb++sACgkQ7h1EHJHTBIXXMQ//b3o+gHVF4F82VXGA5HGu0I/Z+0Zn8NMNI9qRYDmpDrMT4K8/XWqrPrGVORdDyd48CCMVfMrOEetWPmvd2JPSwJ/0flgwi0NdskMZN4D7hrvva9WA7M43UV5ACqoulKg9wwsBc3ei9ee+xV5lenoKoaRkhUxP8VyMydPQy7MStz8LrX5KMFnITitus8U1fO8s9jdrdAbhDJGhDG2Qxn67DFDtgoUZv1Xk3GAM9pyXL1Fn74waRGqaKRUx6BZA03DPPkbOuHAKGfCmsBqLMSWuVtx9JReL5DHZlSnK4guMd3EBinYfF/gOU+OsujFhLPeDwh6D4cfYEyMQsmL6VNWlX4p75cHrtjDPIPwsDu1s5gf37WwalrX68cbovoDJvO11VSLFy6cqDWfc25k1TYjDClb2pVwyL+kyoreBeSVDSLI5aEgK22q5BxznLzbWnCgXi0+VdrbmRXi8LRepns5mfgWD/kOJgTAZRfQNb1G5vLx+gxOv0h8m1aIXSPHlk1NQRBumpd4CgEsWaod5q7LhYOeP0hys8k//hWU2XWsyv45jBAcDO6XR37uys5CE7w9e+q0cQDSx7xmuy+DW9oI65+RKcK3muGesBnoAf9BEYsQkg6/cijiPwda3IDhptHm5R3pfqZPDlziTeEKx/TBoQHNWmwI3AYH1v1aFsWeU+f82Cw/9HWMFl3zo3KbWI4tdHTIOgD6UpeInXs45gXMDs/iw4mNQWnCcLDngwI82o0AZHX25WKmHSg6LEAoQgE/GpSBo4tzOcDftsUa8/zDpW88faNTKTcaxjVUuixsxxTgRF2hAwLYDZ/UcOT0hMrM2FN4K/2QpZQLOCQOSU8hdSPHIW/Kop7F/Horwt4SlyyWehBH4CRy6WXokoa2kBGchfTQ2h8ROuIAF45ODvwzfBxzpl4FnTZVbsv1Sh+9nh8PQfjcBoH6o/c5Ti5iBmUKWIlGcnTceaT4quOVy7dYOueO89phVfh12EX1fOifnzZtx5pHGGT9atgCcXY0CAgmzR1oFfge6+wZX9DAOYPicl8gnWSBnwYzOLEu7+5dfOmbADgOWDYwSxtaWdoXnQzizUYHcRerwVGsuqhb7CcQ5FiZgOX6EIpCitlz9gznGPPsVpxOVETwcARmwLAo+yfL4Ci5ArNaauisxGO4ioDZvTuUgzFfMDVDINizwa8tG0BSfD7EHeCs6pRA6HbHfSsBQ+gdCI0LnT0b+S8G5C4YCaGIGhvnHG8sCYan44ZNo47Ez4Z1hPjgVwo2I+grqvRStnRs8i8O18z5xLwx9g5o6FUjXm3ez/MylV/UoL3zBarzOaipAdOuTFwxC95aansKixfjvulqFbbJWRzx96Ipr3NoSP+g==DqSH-----END PGP PUBLIC KEY BLOCK-----You can then install the CLI in your CI workflow by running:
CLI_VERSION=1.12.0 ./install-common-fate-cli.shThe CLI requires a few configuration variables to tell the CLI where Common Fate is running, and how to authenticate to it. You can obtain these from your Terraform provider configuration block:
provider "commonfate" { api_url = "https://commonfate.example.com" # corresponds to 'CF_API_URL' environment variable oidc_client_id = "7qf6ncnf0qudvpgp93l96397uk" # corresponds to 'CF_OIDC_CLIENT_ID' environment variable oidc_issuer = "https://cognito-idp.us-east-1.amazonaws.com/us-east-1_abcdeFGH" # corresponds to 'CF_OIDC_ISSUER' environment variable}You can look up the Terraform OIDC client secret by finding it in the deployment outputs following our guide here.
To use the CLI, you’ll need to export some environment variables:
export CF_API_URL=https://commonfate.example.com # replace this with your API URLexport CF_OIDC_CLIENT_ID=abcdefGHIJKL12345678 # replace this with your Client IDexport CF_OIDC_CLIENT_SECRET=XXXXXXXXXXXXXXXX # replace this with your Client Secretexport CF_OIDC_ISSUER=https://cognito-idp.us-east-1.amazonaws.com/us-east-1_abcdeFGH # replace this with your Issuerexport CF_CONFIG_SOURCES=env # tell the Common Fate CLI to only source config variables from the environment, rather than looking in ~/.cf/configTo install the cedar policy CLI, copy the following script into your repository:
echo "Building Cedar..."cargo install cedar-policy-cliYou can then install the CLI in your CI workflow by running:
./install-cedar-cli.shThen, you can run the validation command:
cedar validate --schema entities/common-fate.cedarschema.json --schema-format json --policies default_policy_for_testing.cedarIf you want to validate all *.cedar policies instead, run:
find . -type f -name '*.cedar' | xargs -n1 cedar validate --schema common-fate.cedarschema.json --schema-format json --policiesAccess testing in CI
Choose a tab below based on your CI provider.
To run access tests using GitHub Actions, you can use the Install Common Fate CLI Action to install the cf CLI, and then run cf tests run -f tests.yml.
You’ll need to add an access test file into your Common Fate configuration repository first.
Here’s an example workflow.
name: Test
on:  push:
jobs:  access:    name: Access Testing    runs-on: ubuntu-latest    steps:      - name: Checkout        uses: actions/checkout@v4
      - name: Install Common Fate CLI        uses: common-fate/install-cli-action@v1        with:          oidc-client-id: abcdefGHIJKL12345678 # replace this with your Client ID          oidc-client-secret: ${{ secrets.CF_OIDC_CLIENT_SECRET }}          oidc-issuer: https://cognito-idp.us-east-1.amazonaws.com/us-east-1_abcdeFGH # replace this with your Issuer          api-url: https://commonfate.example.com # replace this with your Common Fate API URL
      - name: Run Access Tests        run: cf tests run -f tests.yml
As shown above, the workflow requires a few configuration variables to tell the CLI where Common Fate is running (api-url), and how to authenticate to it (oidc-client-id, oidc-client-secret, oidc-issuer). You can obtain api-url and oidc-issuer from your Terraform provider configuration block:
provider "commonfate" { api_url = "https://commonfate.example.com" # corresponds to 'deployment-url' in the workflow oidc_issuer = "https://cognito-idp.us-east-1.amazonaws.com/us-east-1_abcdeFGH" # corresponds to 'oidc-issuer' in the workflow}You can look up the Read-Only client credentials for oidc-client-id and oidc-client-secret by finding it in the deployment outputs following our guide here. Save the OIDC client secret as a GitHub Actions Secret with the name CF_OIDC_CLIENT_SECRET to keep it out of your source code.
The Read-Only client has read access to the policy and configuration APIs but cannot be used for destructive actions.

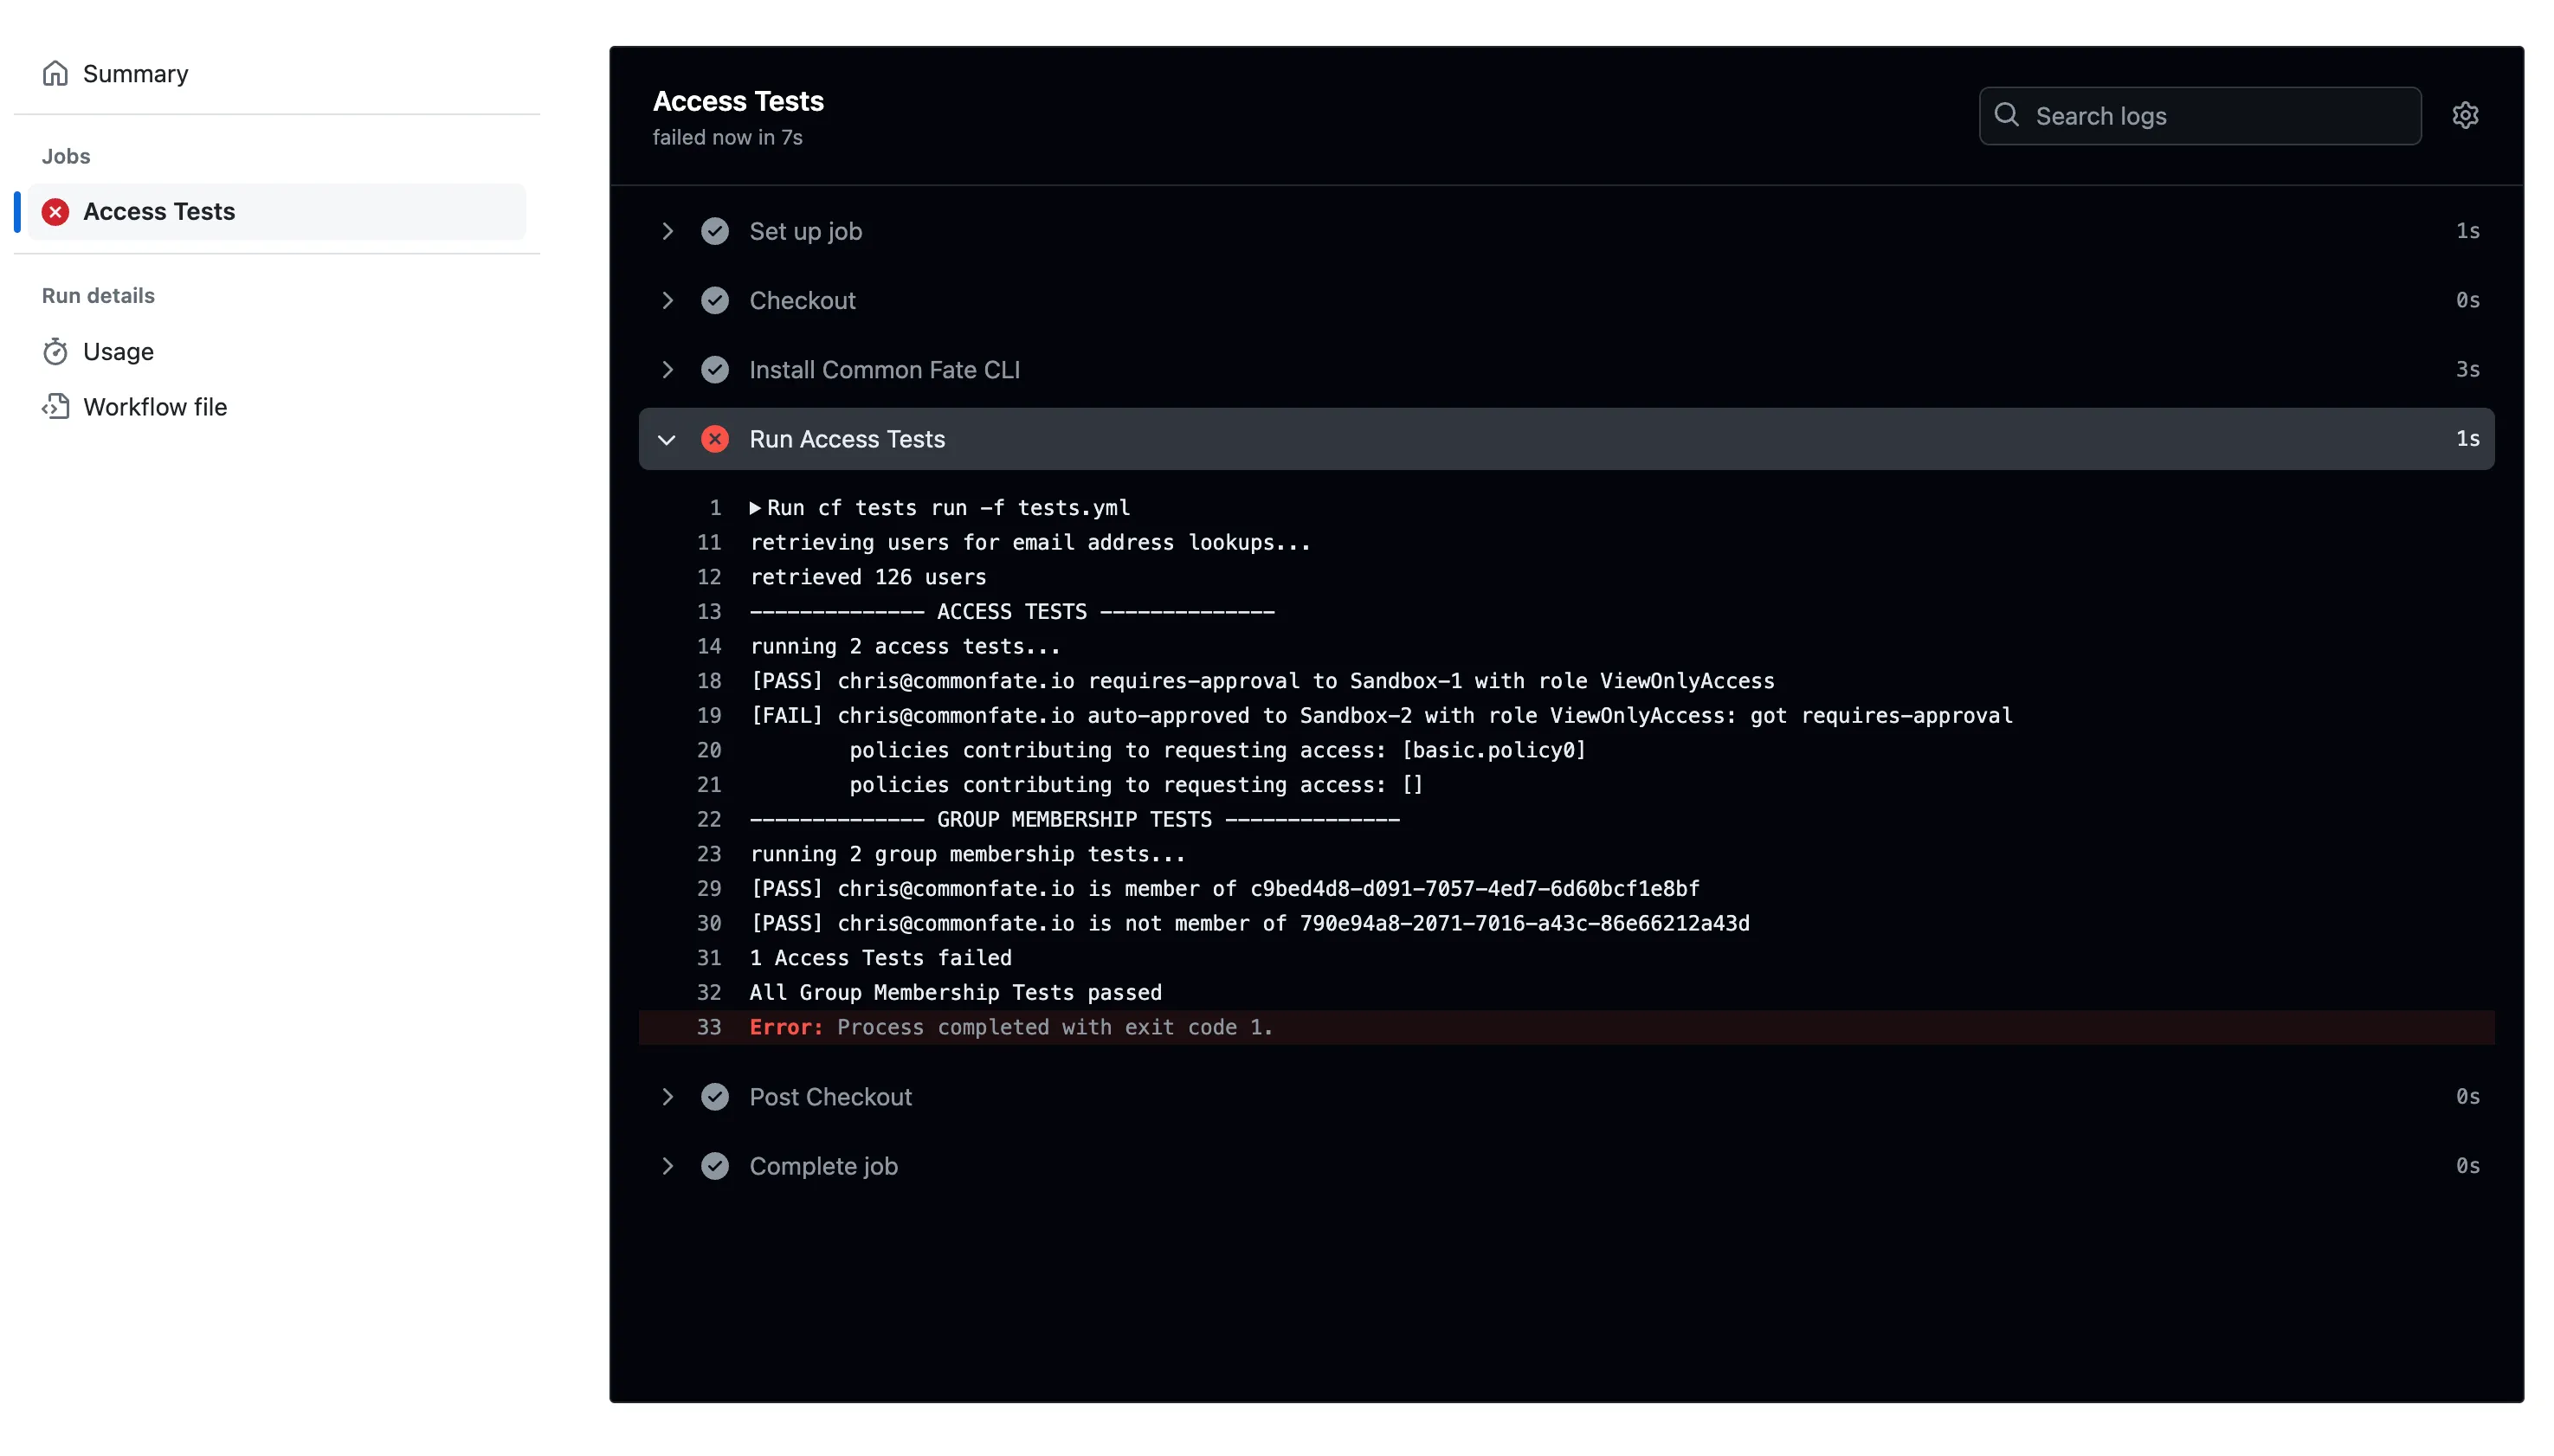
After completing this guide, you should see access tests being executed in GitHub Actions as shown below.

To run access tests using another CI provider, you can install the cf CLI, and then run cf tests run -f tests.yml.
You’ll need to add an access test file into your Common Fate configuration repository first.
Copy the script and signing key into your repository:
KEY_FPATH=common-fate-signing-key.asc
# import the Common Fate signing key
gpg --import $KEY_FPATH
# extract the public key ID
KEY_ID=$(gpg --list-packets <"$KEY_FPATH" | awk '$1=="keyid:"{print$2;exit}')
# mark the key as trusted
(echo 5; echo y; echo save) |gpg --command-fd 0 --no-tty --no-greeting -q --edit-key "$KEY_ID" trust
curl -OL releases.commonfate.io/cf/v${CLI_VERSION}/cf_${CLI_VERSION}\_linux_x86_64.tar.gz
# verify the CLI signature (see: https://docs.commonfate.io/granted/security)
curl -OL releases.commonfate.io/cf/v${CLI_VERSION}/checksums.txtcurl -OL releases.commonfate.io/cf/v${CLI_VERSION}/checksums.txt.sigshasum -a 256 -c checksums.txt --ignore-missing
gpg --verify ./checksums.txt.sig
sudo tar -zxvf ./cf\_${CLI_VERSION}\_linux_x86_64.tar.gz -C /usr/local/bin/-----BEGIN PGP PUBLIC KEY BLOCK-----
mQINBGCb9UABEADcK6S4PPSDZRcgR4ToKvljghmL3m8v9A32CvHOTBpWumhfmHoi9zDq/fB/vzhMcxGKrD4D64Rna3T2L2NGVEYTxwm4iwTNBNxKb1VFRlXKZtqXsYk6JCplGLinkSROoZhhGFbJjUE5GGbnuhWgAZbJRd937rumHgA9RNXy2lV0APQo9qvRTkOfqS8LgKNQDY7ljYcGsNgj1uWTqshsYzqm7D/QLy9L+9zR9nD7oO7yoJAmbeyORayAXcZZafw/SXHHZDeiuQgJwsuAP+Xgg63TGyAZgB/k73tAvw+CfNKejlan0r2uI7JvP9RZI+q+UXVKtiWYCadvmMD6TnXpwlDguR1wF9O8I00UjSm9Uv8I4IHVlaO4cX1NOfA4LaHEgH+43Zefkcl0kq1gkHOq34JjHf1DNAaxT4BDx8GZPIw14dXw3PLuCF1xAjqTA5KuAH6A91ZeIkaYAWmZJeZo7HyLXhrN9oMeFY0EyAXBcnHLapHcqwlq32eECjN1k6wgeiygNjOLvGx5n3UG5lTg3EJ3CIAwxnWROGQDnZ3u3ibxJi80saVvIBpheTr+hIUQMal/3QKX4JRl/+CYbtypazIOc9UNRxEkRENqJTaD24ww//iyITXYL5yXlhl5Z8nIJui4q3z1nBvmTBkF1H0BVacBPeI2abEXZjMp2L2FT7cZJQARAQABtCRDb21tb24gRmF0ZSA8c2VjdXJpdHlAY29tbW9uZmF0ZS5pbz6JAk4EEwEIADgCGwECF4AWIQRlq3JbAeZchQUfn9VQJHir49jtcQUCYJv2rgULCQgHAwUVCgkICwUWAgMBAAIeBQAKCRBQJHir49jtcXdeEACpc9jNKsZWKD6ozToKIK3/RBHNwfEIoaAb8hvm18y51HA3ugKsSxjf2zkX8zwGpIdzM8QiMTKEAK2Ka0cYP9ZMGGE5NuzTy44SP+MRUUvXC5QNSIfH+eD/PxNih2pxLzUGGaqMuPzHAP4aovx/0GMzFWpOR6AIgVHo+zmygfpiWmYbBntDcMsRssTGkfnisuL/QJ7cWTl+mStg5wJybTXGdm6A6bGlqp3n+UDjq1s9vQRfq1kFZJdu36LbG5OZMGVzQswtZtj5DOMSQWgwnJdSPjJrnFbe4ieu3rFysdE3gu+ZFKdNN+v1FUOtwo0I3W7m2W4axJc3wpcQXbYZGw2RsAgWpKHSN8uVzT9CYxl7MoANDvxwmQVLRFUao3qtSZVJtNo829145/dS88Auawf0PpV1yEFPf9FkWJQOVjSQnq8vwsoNivMOcBh+kpsYHVi9IEbMEBwK/FS79NFAl63tb4Z5JKHXLYEVU5D/PmCFCd326QDAWzELvEAW45SH6G6TCSW2yy/Q2wf+VXfenm1THzCsIhaS0TDlQCPM60uqzVy0Cg7TCbrIp4AKrZoAypd4fIzvsnVHZg6iqPHHT74ZKC4tyljWE0VJZTqLrakjXyrNX03IHJ/qGplreOnK4sAm19kISVI3Np9XEllAhrDv8478nmM0Q66ej14VQKjTlLkCDQRgm/vrARAAuqUKr/Gb2Il235ramYnjDzJH8zErpO90Cd7SXKMdBtw5ArBG1k9d6QeorB/6Z21A3Xf0QphiUkfNeWXlkcewuFwDBJiIv4Y2XC/EzmxRA9B0OX5A44TityUKWQbdNpxhNqiOEnqGqV2DVwxkOdeuaBc4cXbEKL+DRnZVMNdwBilakl3ZX5b8uyGXnZm4ExACi4Cs63r4vd3s0sQoT4YxiCusaVnJSsvt+Tk6qMcFyqlWca9DBTsFXCkDCsBiXMDDkU+03rJvBsh1r+9ZqOGgrecB8hMCPrJ6omr4MLmtwLFOFyYcsuar5IPUenws3g1NIK31kDX/I4ARN560LKovj8rSJOEFhAQ2JRPV0hJ8iFqkq0+pJtlXMsq57SDgpaECJ+R+tkUuqal1W+cqiwW6yRP7GrqxPogJsThucES8RiE3IT0IRBv70OYvP268Y/392p8VrBDifsy+BWfRrX6kLDSYKyCBrbeQ8dA4uk7YZJg1p5uevCiCOQ+MbFucRHxHaLv7xf+3Gvac8R2F///T4NjxdcNWorz158ZuOb1G3uN/4auwNFcDKv2+ASeTgTLZP1VBuOB9fieyY/9YI1d5wcxKQ+z69NQjYJNkxs7PHZWEakuztIWna72KqEYVMs4+tVyli+2dkcJD8KpHlvoVKH6Vl7KCiic5lx6FPf+Ku0MAEQEAAYkEbAQYAQgAIBYhBGWrclsB5lyFBR+f1VAkeKvj2O1xBQJgm/vrAhsOAkAJEFAkeKvj2O1xwXQgBBkBCAAdFiEEEOpsCUoAPpLrr9eQ7h1EHJHTBIUFAmCb++sACgkQ7h1EHJHTBIXXMQ//b3o+gHVF4F82VXGA5HGu0I/Z+0Zn8NMNI9qRYDmpDrMT4K8/XWqrPrGVORdDyd48CCMVfMrOEetWPmvd2JPSwJ/0flgwi0NdskMZN4D7hrvva9WA7M43UV5ACqoulKg9wwsBc3ei9ee+xV5lenoKoaRkhUxP8VyMydPQy7MStz8LrX5KMFnITitus8U1fO8s9jdrdAbhDJGhDG2Qxn67DFDtgoUZv1Xk3GAM9pyXL1Fn74waRGqaKRUx6BZA03DPPkbOuHAKGfCmsBqLMSWuVtx9JReL5DHZlSnK4guMd3EBinYfF/gOU+OsujFhLPeDwh6D4cfYEyMQsmL6VNWlX4p75cHrtjDPIPwsDu1s5gf37WwalrX68cbovoDJvO11VSLFy6cqDWfc25k1TYjDClb2pVwyL+kyoreBeSVDSLI5aEgK22q5BxznLzbWnCgXi0+VdrbmRXi8LRepns5mfgWD/kOJgTAZRfQNb1G5vLx+gxOv0h8m1aIXSPHlk1NQRBumpd4CgEsWaod5q7LhYOeP0hys8k//hWU2XWsyv45jBAcDO6XR37uys5CE7w9e+q0cQDSx7xmuy+DW9oI65+RKcK3muGesBnoAf9BEYsQkg6/cijiPwda3IDhptHm5R3pfqZPDlziTeEKx/TBoQHNWmwI3AYH1v1aFsWeU+f82Cw/9HWMFl3zo3KbWI4tdHTIOgD6UpeInXs45gXMDs/iw4mNQWnCcLDngwI82o0AZHX25WKmHSg6LEAoQgE/GpSBo4tzOcDftsUa8/zDpW88faNTKTcaxjVUuixsxxTgRF2hAwLYDZ/UcOT0hMrM2FN4K/2QpZQLOCQOSU8hdSPHIW/Kop7F/Horwt4SlyyWehBH4CRy6WXokoa2kBGchfTQ2h8ROuIAF45ODvwzfBxzpl4FnTZVbsv1Sh+9nh8PQfjcBoH6o/c5Ti5iBmUKWIlGcnTceaT4quOVy7dYOueO89phVfh12EX1fOifnzZtx5pHGGT9atgCcXY0CAgmzR1oFfge6+wZX9DAOYPicl8gnWSBnwYzOLEu7+5dfOmbADgOWDYwSxtaWdoXnQzizUYHcRerwVGsuqhb7CcQ5FiZgOX6EIpCitlz9gznGPPsVpxOVETwcARmwLAo+yfL4Ci5ArNaauisxGO4ioDZvTuUgzFfMDVDINizwa8tG0BSfD7EHeCs6pRA6HbHfSsBQ+gdCI0LnT0b+S8G5C4YCaGIGhvnHG8sCYan44ZNo47Ez4Z1hPjgVwo2I+grqvRStnRs8i8O18z5xLwx9g5o6FUjXm3ez/MylV/UoL3zBarzOaipAdOuTFwxC95aansKixfjvulqFbbJWRzx96Ipr3NoSP+g==DqSH-----END PGP PUBLIC KEY BLOCK-----You can then install the CLI in your CI workflow by running:
CLI_VERSION=1.15.1 ./install-common-fate-cli.shThe CLI requires a few configuration variables to tell the CLI where Common Fate is running, and how to authenticate to it. You can obtain these from your Terraform provider configuration block:
provider "commonfate" { api_url = "https://commonfate.example.com" # corresponds to 'CF_API_URL' environment variable oidc_client_id = "7qf6ncnf0qudvpgp93l96397uk" # corresponds to 'CF_OIDC_CLIENT_ID' environment variable oidc_issuer = "https://cognito-idp.us-east-1.amazonaws.com/us-east-1_abcdeFGH" # corresponds to 'CF_OIDC_ISSUER' environment variable}You can look up the Terraform OIDC client secret by finding it in the deployment outputs following our guide here.
To use the CLI, you’ll need to export some environment variables:
export CF_API_URL=https://commonfate.example.com # replace this with your API URLexport CF_OIDC_CLIENT_ID=abcdefGHIJKL12345678 # replace this with your Client IDexport CF_OIDC_CLIENT_SECRET=XXXXXXXXXXXXXXXX # replace this with your Client Secretexport CF_OIDC_ISSUER=https://cognito-idp.us-east-1.amazonaws.com/us-east-1_abcdeFGH # replace this with your Issuerexport CF_CONFIG_SOURCES=env # tell the Common Fate CLI to only source config variables from the environment, rather than looking in ~/.cf/configTo install the cedar policy CLI, copy the following script into your repository:
echo "Building Cedar..."cargo install cedar-policy-cliYou can then install the CLI in your CI workflow by running:
./install-cedar-cli.shThen, you can add the testing command to your CI pipeline:
cf tests run -f tests.ymlYou should see output similar to the following when your CI pipeline runs:
retrieving users for email address lookups...retrieved 126 users-------------- ACCESS TESTS --------------running 2 access tests...
[PASS] chris@commonfate.io requires-approval to Sandbox-1 with role ViewOnlyAccess
[FAIL] chris@commonfate.io auto-approved to Sandbox-2 with role ViewOnlyAccess: got requires-approval  policies contributing to requesting access: [basic.policy0]  policies contributing to activating access: []
-------------- GROUP MEMBERSHIP TESTS --------------running 2 group membership tests...
[PASS] chris@commonfate.io is member of c9bed4d8-d091-7057-4ed7-6d60bcf1e8bf
[PASS] chris@commonfate.io is not member of 790e94a8-2071-7016-a43c-86e66212a43d
1 Access Tests failedAll Group Membership Tests passed